Back to Index
GUI LBL Expert window : MIRROR
A GUI LBL Expert window can be invoked only from the GUI
LBL Standard window. While the Standard window contains both coordinates for
a given device, there is a separate Expert window for each direction. Below it is shown for
M3, Horizontal direction :
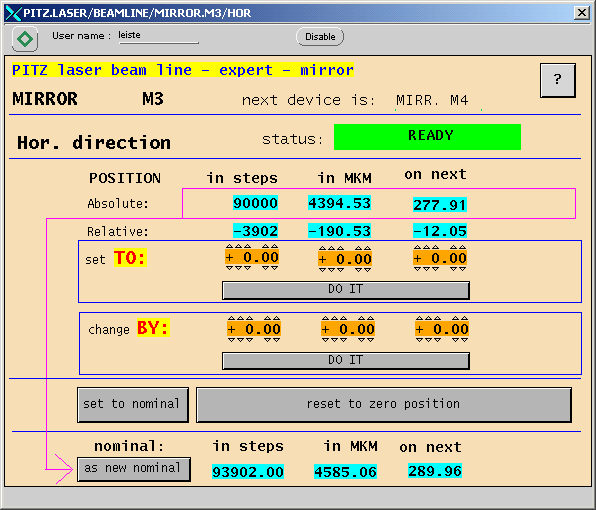
In addition to the operations "change by mm onNext" and "to nominal" which normally are carried out from the Standard window, the Expert window offers
- Additional units which may be useful in some situations, for ex. for very small displacements
- To move directly to a particular position which may be known from some independent source
- To define some actual position as "nominal", i.e. to tell the LBL server to memorize that position for possible further use
- To define or re-define the relative zero position of the given axis (Reset)
All these options are probably needed only occasionally, so, to avoid overload of a joint window they were separated here in this Expert window. Moreover, the "Reset to Zero" operation needs special care, is very time consuming and hence should not be invoked without good reason.
As usual, the window displays some general information which is self-explaining, that is type and name of the device it is connected to, the moving direction and the name of the "next device". Following are some comments on the meaning of the different remaining lines of the window. Note that the order of explanation does not follow completely the order of lines in the window.
1. Informational parts
![]() :
:
Informs the user on the units in which the numbers following in the three
colums are to be understood. The last column, "on next", is the same
unit in which values are diplayed in the Standard window. The other two colums
refer to the real hardware situation at the physical axis : The number of steps
the Steppermotor has carried out starting from the chosen origin (0) and the
corresponding elongation of the micrometric screw.
Note : "Steps" is the only unit the LBL Server and the connected electronics is working with. The other units are calculated from the parameters of the StepperMotor, its Gear reductor, the construction of the mirror support and the positions of the different devices.
![]() : [read
only parameters]
: [read
only parameters]
Gives the actual absolute numbers in the units explained above.
The values are send to GUI from the LBL server. The maximal numbers in the units
described and for the three mirrors are given in the following table (all
minimal values are 0) :
| Mirror | Max. Steps | Max. Microns | Max. onNext |
| M3 | 163840 | 8000 | 505,92 mm |
| M4 | 122880 | 6000 | 274,73 mm |
| M5 | 163840 | 8000 | 368,00 mm |
![]() : [read
only parameters]
: [read
only parameters]
Gives the positions in the different units relative to the so-called nominal
position. The nominal position can be set by the user using a special button in
this window (see below).
 : [button and read-only parameters]
This line combines two things. The right part just displayes the presently set
nominal position in the different units. One can verify that comparing the
actual line with the lines "Absolute" and "Relative" above.
In the left part the active button "as new nominal" is placed. Clicking that button the LBL Server will memorize the actual "Absolute" position as the new "Nominal" position and re-calculate the "Relative" position. The three lines will look after that as follows :
![]()
![]()

Note :
- The operation "as new nominal" causes no displacement whatsoever.
- Once initiated, the operation is uninterruptable, hence no "Emergency stop" is foreseen.
2. Action buttons and Status field
2.a. The status field
The status field is common to all operations on the given axis. If the axis
is idle and willing to execute an operation it looks as shown below :
![]()
Once an operation is started, the field changes color and wording :
![]()
At the successful completion of the operation the status returns to READY.
Otherwise, if an irregularity or error is observed by the LBL Server, the status window becomes an active button telling the operator that it is willing to show the WARNING or the ERROR message behind it :
![]() or
or ![]()
A click in the field opens an additional window either for a WARNING message
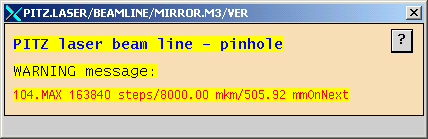
or for an ERROR message
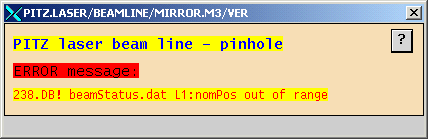
Within the limited space inside the message window some information on the irregularity observed by the LBL Server is displayed. More information can be found in LBL Warning messages or in LBL Error messages. The WARNING/ERROR number guides you quickly to the right place.
NOTE :
- After a WARNING message operation can continue without limitations, the LBL Server does not insist on any reaction to it. So, the status "show warning" is equivalent to "READY"
- After an ERROR message, however, operation is blocked, either completely or for the given axis, and steps have to be undertaken to bring the system back to normality. Consult LBL Error messages.
2.b. Displacement preparation
In the present window, two types of displacements are possible, the type "change by"
 : [button and read and write parameters]
which is identical to the one in the GUI LBL Standard window , just with the option to invoke it in different units, and the type "set to"
 :
[button and read and write parameters]
:
[button and read and write parameters]
which allows the user to move directly to a specific position.
An input value in one of the six Input fields can be set clicking the
rotators above or below the field. Alternatively, clicking in the Input field itself, a
additional Text Input Window opens :
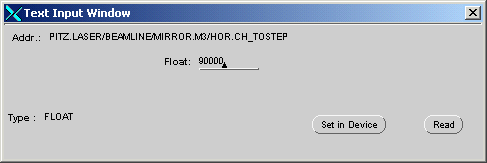
Activate the field Float:, type in the desired displacement (here: 90000) and
click "Set in device". The number will show up in the Input field
from which the Text Input Window was invoked.
NOTE:
- An input value of 0 causes no action whatsoever, even in the displacement type "set to" ! This has been implemented to avoid displacement caused by unintentional clicks on DO IT. If indeed "0" is the desired position, one has to use the displacement type "change by".
- The input value for a particular displacement type and unit, between units and displacement types may be changed freely and any number of times : Only the last value given in one of the 6 Input fields is accepted for execution by the LBL server.
- If not modified, an input value stays valid for 20 sec, after that it is reset to 0 by the server.
- An input value which would result in a displacement outside the limits given in the table above (Absolute:) is denied - no action takes place and a warning message is created.
- The check on the input value is done only at execution state, so any value can be set in the Input field.
2.c. Displacement execution
Once the desired value is entered in the appropriate Input window one has to click the active button DO IT to start execution, here for example with the operation "set to":

The action button DO IT changes its
meaning to EMERGENCY STOP, i.e. gives the operator the possibility to stop
the displacement immediately if he has changed his mind concerning the amount,
type or unit of displacement he ordered previously.
The status window now
tells the operator, that the given axis is moving:
![]()
Note that both buttons DO IT change color and meaning and, once the displacement is finished successfully or an EMERGENCY STOP chosen, both return to idle state and the status becomes "READY" again.
The behaviour in case of non-successful operation see below.
2.d. Set to nominal
The action button "set to nominal"
offers the option to return from any position to the so-called nominal
position, which was previously defined and memorized by the server (see above).
Clicking the button (left side)
![]()
![]()
it changes its meaning :
![]()
![]()
From
all other aspects the behaviour is the same as for DO IT.
No input value is needed, just
push the button. If an input value different from 0 is nevertheless given, it is ignored by the server.
2.e. Reset to Zero Position
The hardware presently driving the StepperMotors is completely incremental, i.e. if starting from scratch there is no way to find out the actual position of any of the axes. Fortunately each axis drive has two End Switches for both extreme positions which can be sensed by the system. One of the End Switches for each axis is used to define the origin of the internal coordinate system.
The Reset to Zero Position command was implemented to carry
out in a reproducible way this definition of the origin. To initiate it one has
to click the button displayed below :
![]()
![]()
To
prevent an accidental start of this lengthy process the LBL Server insists on an
additional confirmation that you really want to start the Reset :
![]()
![]()
The
status window will already show ![]()
At this point the operator has three options :
- Click "NO" to abort the action.
- Do nothing, then the LBL Server aborts the action after 20 seconds.
In both cases the axis returns to idle state, the status becomes "READY" - Click "YES" and the operation will really start, the window now looks as follows :
![]()
![]()
As for other operations, the user has the possibility to interrupt the Reset with an EMERGENCY STOP.
NOTE:
- The whole operation takes several minutes depending on the starting situation, so please be patient and wait till it has finished.
- After the origin is found, the axis is moved to the middle position (MaxSteps / 2).
- For better accuracy, before the Reset of the given axis is started, the second axis of the same device is put to its middle position (MaxSteps / 2). At the end of the Reset procedure it is put back to its old position.
- The previous means also, that during a Reset of one axis the second axis of the device is busy and cannot be used for any other operation. Its status window will show "MOVING"